Content Hub
Stories, Ideas and Advice — Page 40
 story
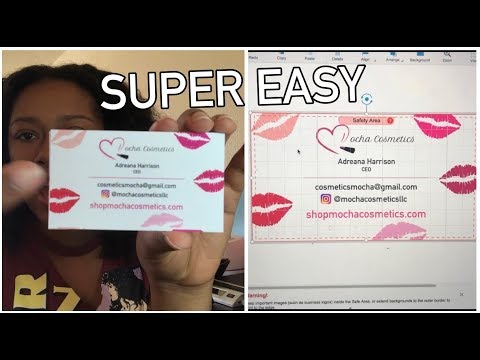
story How to Make Custom Business Cards At Home for Free
source If you have time then this video is for you. It clearly shows how you can easily make custom business cards in the comfort of your home. With so many styles of business cards out there, it should become clear why having the right one is so important for the particular message you want to convey. Think hard about what your custom business cards will communicate what your brand is about and help you seal the deal with your clients. Don’t be afraid to get an original business card just like the one we’ve shared here. After all, the right one might just be what sparks the interest of a new customer! Custom Business Cards You May Consider Let your creative self shine by displaying all your amazing ideas on a blank business card that you can customize with different designs and get a feel of what the final look will be.
 story
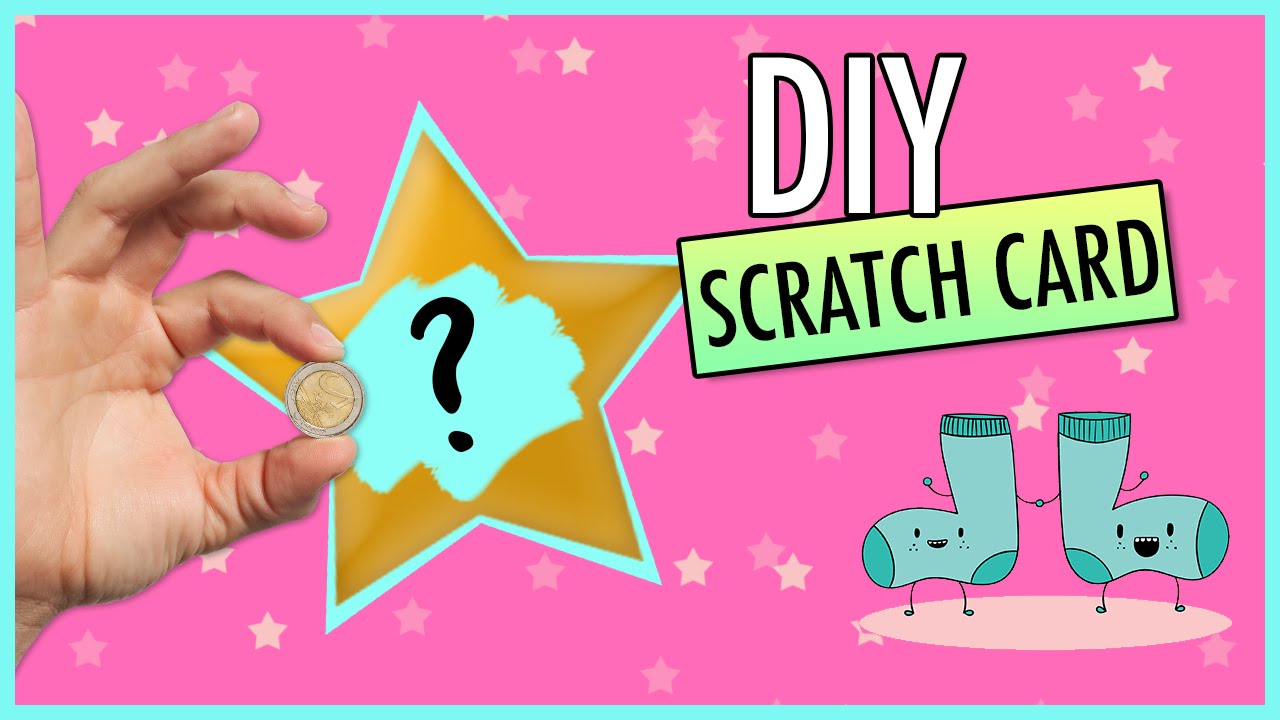
story How to make DIY LOTTERY Scratch Off Card | Easy Gift Tutorial
If you need pretty scratch-off cards for your next party, then here is how you can do it yourself and save money. With so many styles on how to make a scratch card out here, it should become clear why having the right one is so important for the particular message you want to convey. Think hard about what your scratch off card could mean for someone - it could be their lucky lottery ticket! will communicate what your brand is about and help you seal the deal with your clients. Don’t be afraid to get an original scratch card printing Just like the one we’ve shared here, tailored to show you how to make memorable scratch off cards at home. After all, the right one might just be what sparks the interest of a new customer! Scratch Off Card Design Let your creative self shine by displaying all your amazing ideas on a blank scratch off card that you can customize with different designs and get a feel of what the final look will be. Materials Needed Before diving into the creative process, it's essential to gather all the necessary materials. Here's a comprehensive list of what you'll need: Cardstock Paper : Opt for sturdy cardstock paper to ensure durability and a professional finish. Clear Self-Adhesive Paper or Tape : This will be used to cover the scratch-off area securely. Acrylic Paints or Markers : Choose vibrant colors to make your designs pop. Paintbrushes or Fine-tipped Markers : These tools are essential for intricate designs and precise detailing. Scissors or Paper Cutter : To cut the scratch-off cards to your desired size and shape. Templates or Stencils : Card templates are optional but helpful for beginners or for creating uniform designs. Scratch-Off Stickers or Paint : You can either purchase pre-made scratch-off stickers or create your own using metallic acrylic paint mixed with dish soap Design Inspiration When it comes to designing your DIY scratch-off cards, the possibilities are endless. Here are some ideas to spark your creativity: Themed Scratch-Offs : Consider the occasion or theme of your event when you make your own scratch cards, making each ticket a bespoke piece of art. Whether it's a birthday, wedding, baby shower, or holiday celebration, tailor your designs to match the mood and atmosphere. Personalized Messages : Add a personal touch by incorporating custom messages or inside jokes that resonate with the recipient. Interactive Elements : Get creative with interactive elements such as puzzles, riddles, or trivia questions hidden beneath the scratch-off surface. Surprise Reveals, an exciting aspect of crafting your own lottery ticket-like experiences. : Create anticipation by concealing prizes, discounts, or secret messages beneath the scratch-off coating. Brand Promotion : If using scratch-off cards for business purposes, incorporate your brand colors, logo, and tagline to reinforce brand recognition. Techniques for Creating Scratch-Off Cards Now, let's explore some techniques for bringing your scratch-off card designs to life, we'll even show you how to make these engaging crafts. Paint and Dish Soap Method Mix metallic acrylic paint with a small amount of dish soap to create a scratch-off coating. Apply the mixture over your design using a paintbrush, ensuring an even layer, which is a crucial step in how to make scratch off cards. Once dry, the painted area can be scratched off to reveal the hidden content. Adhesive Sticker Method Alternatively, you can use pre-made scratch-off stickers or create your own using adhesive paper and metallic paint. Simply cut the adhesive paper into small squares or rectangles, apply metallic paint over the desired area, and let it dry before attaching it to your design. Clear Tape Method For a quick and easy solution, cover the designated scratch-off area with clear self-adhesive tape, an effective method for crafting these interactive gifts. Then, mix metallic silver paint with dish soap and apply it over the tape with a brush. Once dry, the tape can be peeled off, leaving a scratch-off surface Tips for Success To ensure your DIY scratch-off cards turn out beautifully, here are some helpful tips we've gathered to guide you in crafting your own unique tickets. Practice on Test Cards : Before creating your final designs, experiment with different techniques and materials on test cards to perfect your process. Allow Sufficient Drying Time : Be patient and allow each layer of paint or adhesive to dry completely before applying the next layer or assembling the cards. Use High-Quality Materials : Invest in quality paper, paints, and adhesives to achieve professional-looking results that will impress recipients. Protect Finished Cards : Once your scratch-off cards are complete, consider laminating them or sealing them with clear varnish to protect the design and ensure longevity. Have Fun and Get Creative, as the process of making scratch off cards at home is a delightful craft activity. : Don't be afraid to think outside the box and let your imagination run wild. The beauty of DIY scratch-off cards lies in their uniqueness and personal touch, showcasing the art of craft. By following these steps and unleashing your creativity, you can create stunning and unique scratch-off cards that are sure to delight recipients and leave a lasting impression. Whether you're celebrating a special occasion, promoting your brand, or simply spreading joy, these personalized gifts, like making your own scratch off cards at home, are guaranteed to make a memorable impact. FAQs Q: What supplies do I need to make DIY scratch off cards? A: To make DIY scratch off cards, you will need supplies such as acrylic paint, tape, glue, watercolor, a sheet for printing, and a coin to reveal the hidden areas. Q: Can I use watercolor instead of acrylic paint for DIY scratch off cards? A: Yes, you can use watercolor in place of acrylic paint for creating DIY scratch off cards. Q: How do I create the scratch area on the card? A: To create the scratch area on the card, cover the desired area with tape, paint over it, and wait for the paint to dry before scratching it off. Q: Where can I find printable templates for DIY scratch off cards? A: You can find printable templates for DIY scratch off cards online, Youtube, or create your own using design software. Q: Do I need to apply multiple coats of paint for the scratch off area? A: Yes, it is recommended to apply multiple coats of paint to ensure the scratch off area is fully covered and concealed. Q: Can I make DIY scratch off cards for special occasions like Father's Day or Valentine's? A: Yes, you can customize DIY scratch off cards for special occasions like Father's Day or Valentine's by using themed designs and messages. Q: How do I reveal the hidden message on a DIY scratch off card? A: To reveal the hidden message on a DIY scratch off card, simply use a coin to scratch off the painted area and uncover the text or image underneath, a thrilling moment akin to revealing a lottery ticket win.
 Story
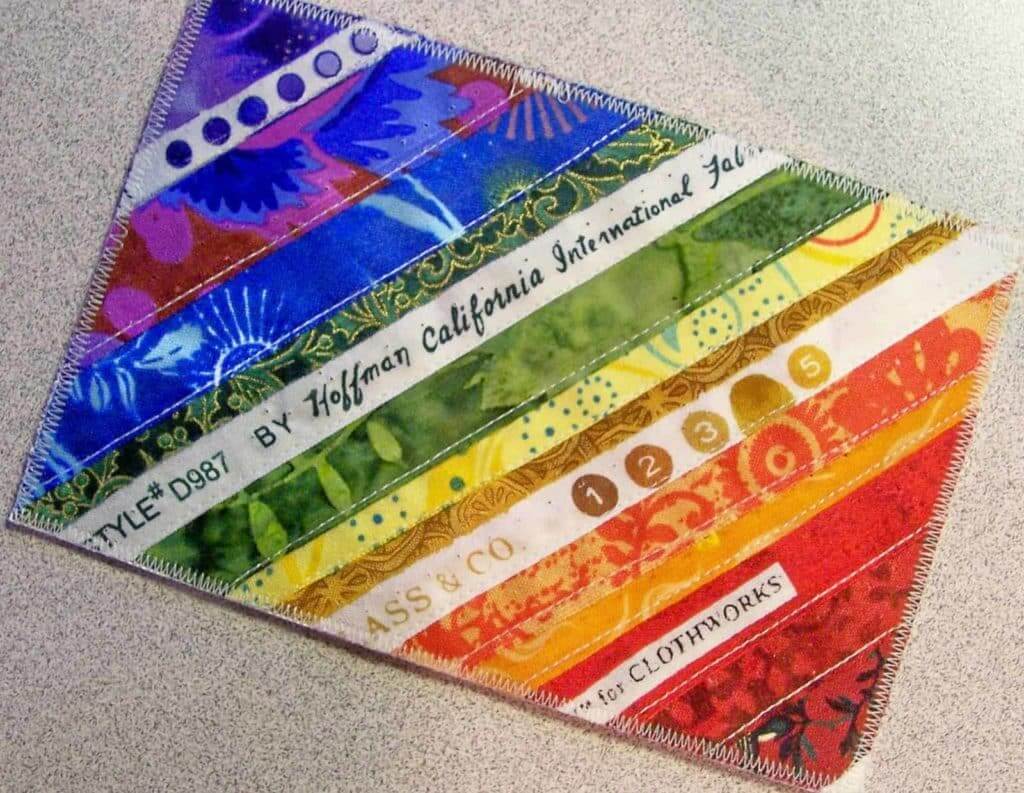
Story How to Make Easy Fabric Postcards With These Free Tutorials
As a graphic designer, you are surely aware that free online tutorials are excellent tools. They introduce innovative styles, techniques and tips you can include in your own designs, while providing you with insights into other designers’ thoughts. Knowing designers must always try new things to step ahead of competitors, we want to share this innovative print concept with you: Fabric Postcards! They are fun to make and certainly unique. Since there are many ways to create trendy works of art, we found these five easy-to-follow fabric postcard tutorials. Perhaps now you can let your creativity run wild! Selvage Postcard Tutorial Isn’t this fancy color arrangement lovely? To make something as beautiful as this postcard, save your selvedges from quilting. When you have enough material, apply your selvedges to any stiff interfacing such as Pellon, the non-fusible kind. After you have a color combination that you like, trim to a rectangle that is a bit larger than the postcard stock you ordered. Remember we offer fourteen postcard printing services in a range of paper stocks and the industry’s lowest minimums. [caption id="attachment_7493" align="aligncenter" width="1024"] Fabric Postcard by Elena McDowell[/caption] Tip from the Printing Experts: Sew a nice zigzag stitch around the outer edge in order to attach your selvage block to the selvage postcard. Last but not least, trim so that the edges look sharp. Aren't these colorful fabric postcards gorgeous? And that’s not all! They also travel pretty well in the mail! Photograph Postcard Tutorial The photograph used on this intricate postcard design was printed on cloth. First, use Photoshop to manipulate the photo. You can use the same technique for printing letters on fabric. Before feeding the fabric through a color laser printer, press the paper-backed fusible web onto the back of a piece of cloth. Spray with Krylon Fixatiff and sandwich fast2fuse between the card's back and front. Trim the card to your desired size. Don’t forget to print the return address on the back of the postcard. [caption id="attachment_7494" align="aligncenter" width="564"] Fabric postcard by Molly Jean Hobbit[/caption] Tip from the Printing Experts: Try to use a light colored fabric so the letters and the message stand out. Lastly, finish the edges of your photograph postcard with fused binding. This will automatically give it a highly professional and finished look. Quilted Postcard Tutorial Isn’t this quilted postcard breathtaking? This lovely shade of green used on the stitching highlights the seahorses beautifully! Absolutely clever! To come up with a similar design start with a stabilizer and cut to 6 ½" x 4 ½". Then, prepare the background – it can be a pieced or whole cloth that you like. Bear in mind that you must cut it a bit larger than your stabilizer and sew it to the stabilizer. Using a light or invisible thread in your bobbin or a decorative thread in the machine, carefully quilt the postcard using the stitches you select. Cut a piece of natural muslin slightly larger than the postcard before fusing it on the other side of the stabilizer. Lastly, use a ruler and rotary cutter to trim your postcard to 4" x 6". [caption id="attachment_7495" align="aligncenter" width="504"] Fabric Postcard by Tresha Barger[/caption] Tip from the Printing Experts: To properly finish the raw edges of your quilted postcards with fused binding, you'll need 1"strips of fabric if you prefer a 1/4" binding on the front of postcards. Use 5/8" strips if you like 1/8” binding. Make sure to cut a 22 inch strip length for each 4" x 6" postcard. Embellished Postcard Tutorial This jaw-dropping postcard was created by using embellishments on a batik background. First, arrange the Angelina fibers and other embellishments on the fabric prior to using a glue stick to keep them in place. Next, thread your sewing machine with YLI's Wonder Invisible Thread. Use a zigzag stitch to attach laces. Cut a piece of organza and press fusible web on it before removing the paper. Machine quilt the postcard. Last, trim it to measure 4" x 6" and finish the edges. [caption id="attachment_7496" align="aligncenter" width="238"] Fabric Postcard by Linda Vincent[/caption] Tip from the Printing Experts: To embellish your fabric postcard, there are tons of decorative elements to choose from. In addition to Angelina fibers, you can use lace, fussy cuts, ribbon, tulle and paper. You can rubber-stamp, paint, embroider or even add small beads – anything that will give your fabric postcard design an one-of-a-kind look. Beautifully-Colored Postcard Tutorial The color placement they used on this fabric postcard looks sublime - we love it! To create a design like this one, pick an off-white marbled fabric to be used as your background. Next, draw the individual feathers by using Sharpie markers on the paper side of fusible and press it to the fabric. Cut the feathers before placing them on the background. Draw little circles, stripes, flowers or other designs on the feathers using the same markers. [caption id="attachment_7497" align="aligncenter" width="564"] Fabric Postcard by The Quilt Rat[/caption] Tip from the Printing Experts: If you use a plain back, it is much easier to trim the fabric postcard as there is no need to worry about lopping off pre-printed lettering. There are plenty of fabric options for the back. As mentioned earlier, print the recipient's name and address and the return address on a light colored fabric. Which tutorial did you like best as a professional graphic designer? Are you ready to try it? What are you waiting for? Please feel free to leave a comment with your insights and thoughts. Don’t forget to stop by 4OVER4.COM and check our product catalog for new printing ideas. We’re offering users who create an account with 4OVER4.COM an extraordinary 30% off their first order on any print product! Sign up now!
 story
story How To Make Embossed Business Cards?
Embossed cards are tactile to the touch and visually appealing. This property helps to create a lasting impression on your audience and sets you apart from regular businesses. But do you wonder how to make Embossed business cards? This article has the answers. Understanding Embossed Business Cards: What Sets Them Apart We make Embossed cards by stamping the card stock with a die. This die is a metal plate that has been precisely cut to mirror the elements of the design that will be embossed. This process creates a recessed or raised three-dimensional effect on your business card. The procedure is often used to highlight your brand's name or logo. These cards are special for several reasons, namely: Tactile experience: The raised elements on the card help create a 3D-like effect that recipients can feel as they run their fingers over the design. This experience adds luxury and sophistication to your business card and brand. Visual appeal: Embossed design stands out and adds elegance to your card. The effect beautifully highlights important details of your design. Perception of quality : Customers associate Embossed cards with quality and attention to detail. As a result, your brand image benefits from this association with value and excellence. This perception of quality is critical when selling high-end products or services to upmarket clients. Differentiation : Regular-looking cards may fail to leave a mark when you hand them out at networking events. But an Embossed business card increases your likelihood of being noticed and remembered. Enhanced branding: Raised elements can emphasize key elements of your brand, such as your name, logo, or tagline. Such memorable branding helps you become well-known and trusted. We’d now see how to make Embossed business cards. How To Make Embossed Business Cards? Creating your own Embossed business cards may seem daunting, but we've simplified it so you can enjoy effortless recognition with these 3 steps: Create a business card design Select the embossing option on the Extreme Custom Business card page Upload your design to order A simple design often works best for the effect. So try not to clutter your card or include outlandish design elements. Instead, focus on the key information you wish to highlight. But how do you ensure you choose the right paper and cardstock for the design? Choosing the Right Paper and Cardstock for Embossed Effects Embossing is available in thicker paper stock: 32pt Silk Laminated, 48pt Silk Laminated, 32pt Velvet Laminated, and 48pt Velvet Laminated. Simply choose the thickness and finish that suits you on our Extreme Custom Business product, and we'd apply the chosen paper type. Embossing Techniques There are 2 commonly used embossing techniques: Blind embossing, and Foil embossing. Blind embossing: This technique does not utilize colors or foils to highlight the raised effect further. As a result, blind embossing has an elegant and subtle look. This option is perfect for minimalist designs. Foil embossing: This combines the application of metallic or colored foils to the raised effect. Thus, creating a lustrous and eye-catching business card design that’s luxurious and outstanding. Conclusion For those diving into the world of professional networking, business cards remain a fundamental tool. Not only does it convey your contact information, but it also reflects your brand's identity and professionalism. If you're keen on crafting a business card that stands out, our comprehensive guide on how to make business cards provides in-depth insights and creative ideas. Whether you're exploring the basics or seeking innovative designs, these resources offer invaluable tips to ensure your business cards make a lasting impression. Now you know how to make embossed business cards and how effective they can be. We help you create stunning and unique cards that will captivate and impress any audience.
 story
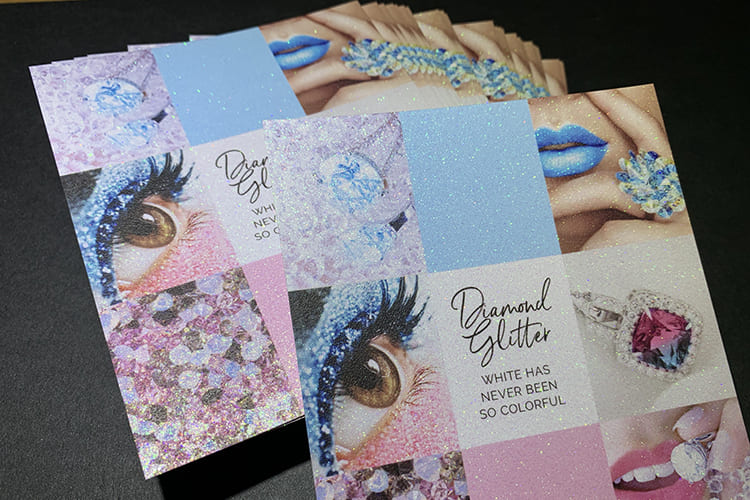
story How To Make Glitter Business Card
A glitter business card has a shimmering effect on the surface. Hence, these cards add glamour and sophistication to your business or brand. Usually, we print them on special paper with glitter particles embedded in the material, so they remain durable and don't shed the glitter. Cards with glitter are popular in the fashion, beauty, and entertainment industries or businesses that want to leave a lasting impression on the prospect. We’d now see how to make glitter business cards and what makes them attractive. What Makes a Glitter Business Card attractive? They are attractive for the following reasons: Visual appeal: The glitter is attention-grabbing and adds charm to your card design. Also, due to the shimmering effect, your business cards can catch the eye and stand out from plain alternatives. Quality materials: These cards are made from high-quality paper and printing techniques, making them look and feel impressive. Hence, cards with glitter are more durable than plain cards. In addition, they're shed-free and won't leave traces after handling. Uniqueness: Unlike plain-looking business cards, the glittering effect will set your business apart and give customers a memorable impression. Design: Glittering cards communicate your brand values effectively. A visually appealing card tells customers you have an eye for beauty and detail. Glitter business cards are attractive when they effectively combine quality material, a well-designed layout, and a unique appearance to create a lasting impression. We’d now see how to make glitter business cards. How to Make Glitter Business Cards? There are several ways to create the glitter effect on cards: Foil stamping: This printing technique involves applying a metallic foil to the card's surface using heat and pressure. You can apply the foil to specific areas of your card or the entire surface, thus creating the shimmering effect. Printing on glitter paper: Glitter paper refers to specialty paper with embedded glitter particles. Printing your design on these papers creates a glittery effect. You can order these papers online and do the printing yourself. Handmade glitter cards: You can manually glue glitter particles to the surface of your paper stock, but this method is unprofessional and may result in flaky business cards. Printing company: Some printing companies allow you to order glittering cards. Your prints are made using special inks and printing techniques. Glitter business cards produced this way are precise and consistent. Some printing methods come out more professional-looking than others. Consider using glitter paper or a professional printing service for attractive-looking business cards. Where to Get it? You can order glitter business cards on 4OVER4. When you order with us, you can select the size, quantity, and turnaround time for your printing job. Also, you get free proof when you choose the online proof option. The proof lets you preview your project and make changes before production. Simply choose applicable customizations, such as the size and the order quantity, to get started. Next, upload your artwork and choose your delivery or pickup method. We have thousands of free templates that can help you design your business card. We communicate the stage of your order so you know when you'd receive your job. We do not cut corners on quality. Instead, we down prices to ensure you'd get premium prints at great prices. Conclusions For those diving into the world of professional networking, business cards remain a fundamental tool. Not only does it convey your contact information, but it also reflects your brand's identity and professionalism. If you're keen on crafting a business card that stands out, our comprehensive guide on how to make business cards provides in-depth insights and creative ideas. Whether you're exploring the basics or seeking innovative designs, these resources offer invaluable tips to ensure your business cards make a lasting impression. You now know how to make glitter business cards. Utilize the eye-catching, glittery appearance to decorate your brand. Its striking visual features will dazzle clients and set you apart from the competition. Make your order today.
 story
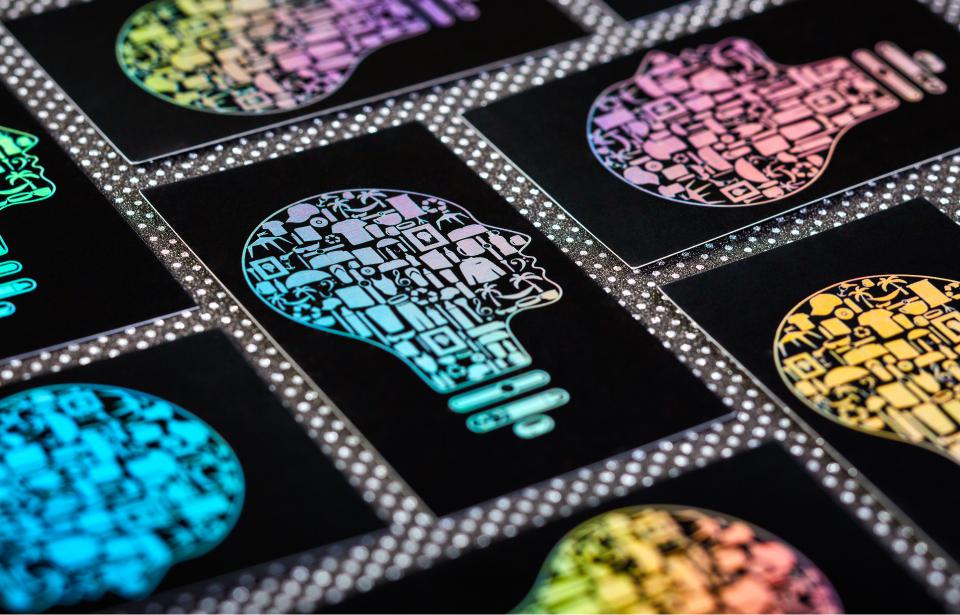
story How To Make Holographic Business Cards
Do you wonder how to make holographic business cards ? We design these cards to dazzle and impress. They are made by stamping holographic foil strips on paper stock, making them reflect a rainbow of colors. The idea of a glimmering business card is appealing to businesses. But if you're in a competitive niche or a futuristic industry, it will help if your brand is outstanding. It's no wonder a holographic business card is popular with these businesses: AI (Artificial Intelligence) Virtual Reality Entertainment Blogging/Vlogging Fashion and Accessories Design and Creative Industries What is a Holographic Card? A holographic business card sparkles and changes colors when they come in contact with light. Adjusting the card's orientation or viewing angle causes it to shine in various colors. A holographic business card is like a pocket-sized neon light sign for your business. Its shiny reflection highlights business card features, such as your logo and name. Thus, these cards allow you to intrigue your audience and leave a lasting impression. Artists, creatives, and professionals are adopting a holographic card design for the following reasons: They are effective The colorful pattern forces customers to engage with your brand. Unlike the reception you get from bland business cards, customers are glued to the holographic effect and want to know what you're offering. Your newfound popularity will result in increased sales down the line. They are exciting and attention-grabbing Today's marketplace has businesses scurrying for attention. But you can indulge your customers with holographic printing that tells a story. Use your business card to make great adverts with the holographic effect. They're graphical A holographic business card is graphical and visual. Hence, you can emphasize your brand's name and logo with a holographic effect. Mesmerize clients with your beautiful business card while getting them to stare and tilt your card to get a different experience each time. Naturally, that extra time on your business card will ensure prospects read your offer and contact your business. How To Make Holographic Business Cards at 4OVER4 Ordering holographic prints on 4OVER4 is easy. First, choose your preferred business card size and print quantity. You save money when you make bulk orders, but you can also make low-quantity orders. Choose the online proof option to get free proof of your order before we print them. In addition, our live pricing calculator gives you a lowdown of the cost, so you always stay within your budget. Lastly, upload your artwork or browse through our templates to design an artwork yourself for free. Then select your preferred delivery method. How Are Holographic Business Cards Printed? We stamp a holographic foil on plain stock paper, which creates a rainbow-like effect when light hits it. There are a variety of holographic foil layers which determine the background color and look of the holographic effect on your card. Examples are raised rainbow holographic and holographic silver and gold (which give the silver and gold rainbow effect, respectively) Designing Your Holographic Business Cards Creating holographic business cards is an exciting endeavor that allows you to showcase your brand in a visually stunning way. Here's how you can design your holographic business cards to make a lasting impression: 1. Choose the Right Design Elements: Begin by selecting the design elements you want to incorporate into your holographic business card. This may include your logo, brand colors, and any other graphical elements that represent your brand identity. 2. Opt for High-Quality Graphics: To ensure that your holographic effects are crisp and vibrant, use high-resolution graphics and images in your design. This will help enhance the overall visual impact of your business cards. 3. Experiment with Holographic Effects: Get creative with holographic effects by experimenting with different patterns, textures, and color combinations. Consider using holographic foil layers to create unique visual effects that reflect light in captivating ways. 4. Incorporate Brand Messaging: Don't forget to include essential information such as your name, title, contact details, and any other relevant information about your business. This ensures that your holographic business cards are not just visually appealing but also informative and functional. 5. Review and Proofread Your Design: Before finalizing your design, take the time to review and proofread it carefully. Check for any spelling or grammatical errors, as well as ensure that all design elements are aligned correctly and look visually cohesive. Printing Your Holographic Business Cards Once you've perfected your holographic business card design, it's time to bring it to life through printing. Here's how the printing process works: 1. Select Your Printing Options: Choose your preferred printing options, including the size, quantity, and finish of your holographic business cards. Consider factors such as paper stock thickness and coating options to achieve the desired look and feel. 2. Upload Your Artwork: Upload your finalized design artwork to the printing platform of your choice. Make sure to follow any specific file format and resolution requirements provided by the printer to ensure optimal printing results. 3. Choose Holographic Foil Options: Select the type of holographic foil you want to use for your business cards. Options may include raised rainbow holographic, holographic silver, holographic gold, and more, each offering a unique visual effect. 4. Review and Confirm Your Order: Before proceeding with printing, review all the details of your order, including the design, printing options, and shipping details. Once you're satisfied, confirm your order and proceed to payment. 5. Await Delivery: Sit back and relax as your holographic business cards are printed and prepared for delivery. Depending on the printing provider and shipping method chosen, you can expect to receive your cards within a specified timeframe. Conclusions You now know how to make your holographic business card. Put the knowledge to good use by ordering for your brand. As we have seen, they are highly graphical, reflecting rainbow colors and other patterns of shimmering colors. Therefore, they are suited for advertising since they capture your business essence while grabbing your prospect's attention. As a result, they are an investment in your business. Put your business in good light when you utilize this innovative printing technique today. FAQs Q: How can I make holographic business cards? A: To make holographic business cards, first, design the card in a software like Adobe Photoshop. Then, print the design on holographic cardstock using a type of printer that can handle the material. Finally, cut and finish the cards to create a professional look. if you want more details, you can visit YouTube and search for some tutorial videos on card makers. You might as well subscribe to the creator. Q: What is the best way to design custom holographic cards? A: The best way to design custom holographic cards is to use software like Photoshop to create a unique and eye-catching design. Make sure to incorporate elements that will shine and stand out once printed on holographic cardstock. Q: Can I use holographic cards for trading card games like Pokemon TCG? A: Yes, holographic cards can be used for holographic Pokemon cards or holographic trading card games like Pokemon TCG. The shiny and attractive finish of holographic cards makes them appealing for collectors and players alike. Q: What is the process of attaching holographic finish to a business card? A: To attach a holographic finish to a business card, you can either print the design on holographic paper or apply a holographic foil to the printed card using a laminating machine. This will give the card a shiny and reflective quality. Q: Are holographic business cards more effective than regular ones? A: Holographic business cards can be more effective than regular ones as they provide a unique and eye-catching appearance that helps in making a lasting impression on potential clients or contacts. Q: What are some optional features I can add to custom holographic cards? A: Some optional features you can add to custom holographic cards include embossing, spot UV coating, or rounded corners. These features can enhance the overall look and feel of the card. Q: How can I make my holographic business cards more durable? A: To make holographic business cards more durable, consider laminating them or using a thicker cardstock material. This will help protect the holographic finish and prevent the cards from getting damaged easily.
 story
story How to Make Laminated Business Cards
Laminating your business card is a great way to protect your cards. It also helps you to stand out because of its thicker stock and beautiful look. Laminations are plastic films applied to sheets of paper after they are printed. The idea of lamination is to make the card last longer and protect it from water, dirt, and abrasion. There are generally three types of lamination you will come across. They are Silk Lamination Velvet Lamination - also known as soft-touch lamination Gloss Lamination In this post, we will help you understand how to make laminated cards and the benefits of having one. Should You Laminate a Business Card? The top three reasons for laminating your business cards are: To make your them last longer To make your them stain-resistant To elevate their elegance Lamination is a good way to cover your card, so it can last longer and resist hand marks, tears, and stains. For instance, your client can have your laminated card in her wallet and never worry about it being dog-eared or torn Rather than have the usual standard clear fronts and vinyl backs, you have a unique card with colorful front and back covers laminated in a high gloss making it more fantastic to look at and stand out from the crowd. How to Make Laminated Business Cards This is how to laminate a card. Laminating your card doesn’t have to be hard. The following steps show you how to make laminated business cards. Step 1 - Print on a quality paper stock once your design is ready. Step 2 - Use a laminating machine that suits your needs. For example, most home users buy machines that can accept documents as large as the standard 8 ½” x 11” letter size. Step 3 - Allow the laminating machine warm-up or at least let the laminator let you know when it is ready. Step 4 - Place the document inside the laminating pouch. The two sheets of laminated plastic are attached at one end. If the pouch is a bit larger than your document, you need to center the document, so there will be an even border all around. Step 5 - Place the laminating pouch containing the document inside the carrier. The sealed end of the pouch should be snug against the sealed end of the carrier. The carrier is two sheets of treated cardstock that can protect the laminating machine from adhesive buildup. Step 6 - Insert the sealed end until the machine is ready to grab it. Refrain from pushing the carrier through the machine; it has to go slowly enough for the machine to fuse the sheets. Step 7 - Trim the edges using a paper cutter or scissors. But leave at least a 1/16” (2 mm) border. You have all the steps on how to laminate a card at home but we know you want a professional job that will be durable and presentable. How c an you achieve that? Where Can I Get It? Although you have learned how to laminate business cards, getting a professional job isn't so easy. If you are looking for the best place to print laminated business cards, you can trust 4OVER4. You can order your laminated cards in custom sizes. Customize any of our thousands of templates or design your card from scratch. You can choose from the 16-point silk laminated or 16-point silk laminate to get your desired look and feel. 4OVER4 offers exceptional printing and laminating solutions at an affordable price. You can trust 4OVER4 for all prints to impress your customers and create brand awareness. Conclusion For those diving into the world of professional networking, business cards remain a fundamental tool. Not only does it convey your contact information, but it also reflects your brand's identity and professionalism. If you're keen on crafting a business card that stands out, our comprehensive guide on how to make business cards provides in-depth insights and creative ideas. Whether you're exploring the basics or seeking innovative designs, these resources offer invaluable tips to ensure your business cards make a lasting impression. Learning how to make laminated business cards can take your business to the next level. Lamination involves putting a protective film cover on your card to help it stand the test of time and remain attractive to your clients. Our modern technology ensures your business card design and print come out clean. Upon confirmation, your order will be delivered within 4-7 working days. Order yours now. FAQs Q: How can I make laminated business cards? A: To make laminated business cards, you will need a laminator, laminate paper, cardstock, and a supply of your choice. First, print your custom designed graphic on the cardstock. Then, place the card in a laminating sheet along with a sheet of laminate paper, and run it through the laminator. Trim the edges if needed, and you're done! Q: Where can I purchase the supplies needed for laminated business cards? A: You can purchase laminating sheets, laminate paper, and card stock from office supply stores, online retailers, or general craft stores. Q: What is the key benefit of laminating business cards? A: Laminating business cards adds a layer of protection to ensure they last longer and withstand wear and tear. It also gives them a professional and polished look. Q: Can I laminate small documents besides business cards? A: Yes, you can laminate various small documents such as ID cards, event passes, instruction cards, and more using a laminator and laminating sheets. Q: How do I know when to replace the laminate paper in the laminator? A: You may need to replace the laminate paper in the laminator when it starts showing signs of wear, such as wrinkles, bubbles, or uneven lamination on your documents. Q: What tips do you recommend for achieving the best laminated results? A: Use high-quality laminate paper, adjust the laminator settings according to the thickness of your paper, and always run a test sheet before laminating your final document. Q: Can I use a plastic comb binding machine to laminate business cards? A: Plastic comb binding machines are designed to work with plastic combs for binding documents, not for laminating. For laminating business cards, it is recommended to use a laminator specifically designed for that purpose.
 story
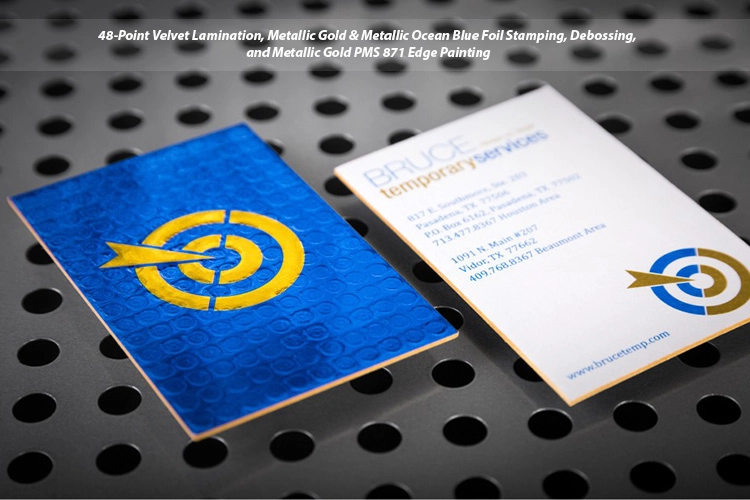
story How to Make Painted Edge Business Cards
Businesses today compete for market share. So customers are unintrigued by everyday marketing. For example, individuals may be unimpressed by a regular-looking business card. But it’s usually the little things you’re missing, like a Painted Edge business card . We’d see what these cards are and how to make Painted Edge business cards. What Are Painted Edge Business Cards? Painted Edge business cards have a distinct, eye-catching appearance since we apply color to their edges. Regular card designs only bother with the front and back of your card, so Painted Edge cards are easily noticeable and intriguing. Some upmarket brands use this technique to add style and sophistication to their card design. These cards also help creative brands and professionals showcase their attention to detail and penchant for elegance. But how do you make them? How to Make Painted Edge Business Cards? You can get edge painting in these ways: Paint the edges yourself Order a painted edge design online Paint the Edges Yourself To paint the edges yourself, you'd need the following items: Business cards Paint in your desired color Paintbrush Disposable plate or palette First, pour paint into the disposable plate or palette, then dip your paintbrush in the paint and begin painting the edges. You can neatly stack up your cards to paint more than one at a time. Ensure to spread the paint evenly for a uniform appearance. Next, allow the paint to dry before handling them. And that is how to make Painted Edge business cards yourself. You can start handing them out when they dry. Making these business cards yourself is fun, creative, and cost-effective. But the process is time-consuming, and the product can be better looking. So a better approach will be to order Painted Edge cards from an online service you can trust. Order a Painted Edge Design Online You can save time and effort by ordering Painted Edge cards from a trusted printing service. While this approach will cost more, it's a good idea since you can customize your order with your preferred paint color, and the finish is professional-looking. In addition, edge paint is not noticeable or impressive on lighter cards. However, a printing service like 4OVER4 will recommend and preselect a higher-quality cardstock for you. Our specialized printing equipment and color-mixing techniques produce high-quality cards that match your specifications. How To Edge Paint Business Cards? So while you can make these cards yourself, ordering online is advantageous. To make your order, select customizations, such as your card size, paint color, and order quantity. You can pick from 15 color options, such as black, blue, red, and pink. Alternatively, you can select a color mix option for Metallic and PMS colors. Also, you can order 250 or 2000+ cards depending on your needs, but you reduce the cost by bulk buying. Our online proof option lets you preview your job before printing. You can make changes to your order and print when you’re happy with the design. After selecting your customizations, upload your artwork and input a delivery address or pickup method to complete your order. Conclusions Now you know how to make Painted Edge business cards. You’re on your way to making impressive cards that will impact sales. For those diving into the world of professional networking, business cards remain a fundamental tool. Not only does it convey your contact information, but it also reflects your brand's identity and professionalism. If you're keen on crafting a business card that stands out, our comprehensive guide on how to make business cards provides in-depth insights and creative ideas. Whether you're exploring the basics or seeking innovative designs, these resources offer invaluable tips to ensure your business cards make a lasting impression. Edge painting is just one technique to set your brand apart. 4OVER4 offers several business card printing formats that tally with your brand's values and resonate with your audience. For example, you may also like our Edge Gilded , Spot UV , or Die-cut business cards. So, what card design are you ordering?
 story
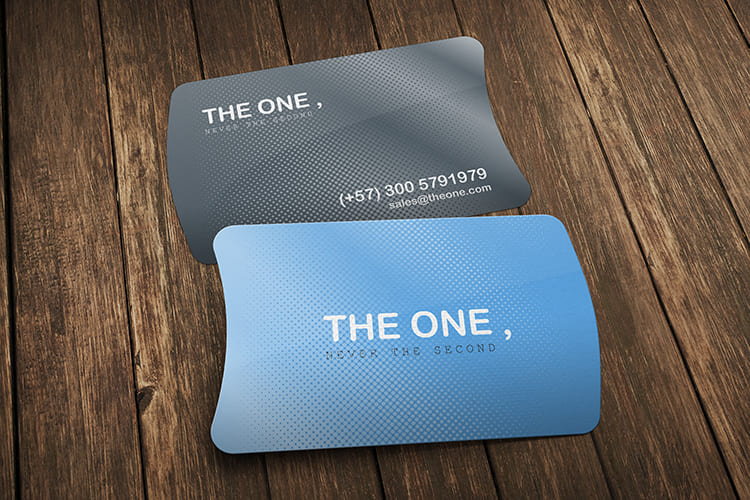
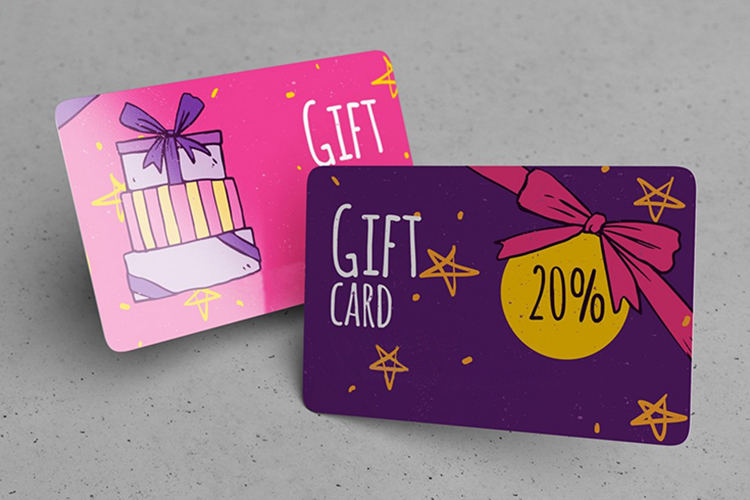
story How To Make Plastic Business Cards
In a world full of businesses, it's remarkably easy to become just another face in the crowd. However, a distinctive approach lies in adopting plastic business cards. These unique cards possess the power to elevate your branding, capturing attention while accentuating crucial information. Are you already asking how to make plastic business cards? Your answers await as you continue reading. Introduction to Plastic Business Cards Today, the one thing that will give you and your business the best odds of turning prospects into paying customers is leaving a lasting impression. Plastic cards have a variety of different uses, including Gift Cards, Discount Cards, Fundraising Cards, Hotel Key Cards, ID Cards, Loyalty Cards, Membership Cards, VIP Cards, and more. Printing plastic business cards like 30mil Clear Plastic (credit card thickness) or 20 Point Plastic is one of the best ways to do this. These visually stunning cards are a cool way for your company to look unique and different. However, there are useful tips and tricks you must know about how to make plastic business cards that will sway your prospects. Advantages of Plastic Business cards. Before we dive deep into how to make plastic business cards, first, let's talk about the advantages they have over their paper counterparts. Here is a close look at a few. Durability: Even the most premium traditional businesses have vulnerabilities compared to traditional business cards. This longevity ensures that your cards vital information remains intact and presentable over time. Unique design possibilities: With plastic cards, you can explore design possibilities beyond the realm of what's possible with paper cards. Longevity and sustainability: Because plastic cards are built to last, they reduce the need for frequent reprints. This will save you money and enhance sustainability by reducing the consumption of ink and paper. Enhanced Aesthetics: Plastic cards are undeniably visually appealing. The glossy finish and vibrant colors contribute to a high-end look that's hard to achieve with standard paper cards. Memorable: The distinctiveness of plastic cards increases the likelihood that prospects and clients will remember you. How To Make Plastic Business Cards Now, it is time to dwell on the nitty-gritty of how to make plastic business cards. Designing your card: Be sure that your designs reflect your brand identity. You may consider using a professional designer or, better still, take advantage of our free online design tools . It's free and easy to use. Choose Plastic Sheet: Select a plastic sheet matching your preferred card size and type. Our 30mil plastic or the 20-point plastic comes in Clear, Frosted and White types. The 30mil has the exact thickness of a credit card so are thicker and more resilient. Check our collection to find what suits you. Print your design : You will need a printer for printing plastic sheets. Consider using online printers like 4OVER4.COM. We are more affordable and offer a quick turnaround time. Adding Special Effects: Foil, Spot UV, and Embossing Add an extra layer of sophistication and professionalism to your plastic business cards designs by incorporating special effects like foil stamping, spot UV, and embossing. These effects signal a commitment to quality and professionalism, leaving a positive impression on potential clients and partners. Other customizations you can add include, optional magnetic stripe & encoding, barcoding with numbering, sequential numbering or other variable data and scratch off pin, Printing Process You can print your high-quality business cards on 4OVER4. Once you are done with the designs, select your desired specifications, upload your design, and place your order. The price varies depending on the order quantity and your selected customization options. Sustainability and Eco-Friendly Option Plastic business cards contribute to reducing paper usage, a major environmental concern. The paper production process involves deforestation and significant water and energy consumption. Opting for plastic cards helps conserve trees, water, and energy, aligning with eco-friendly goals. Conclusion For those diving into the world of professional networking, business cards remain a fundamental tool. Not only does it convey your contact information, but it also reflects your brand's identity and professionalism. If you're keen on crafting a business card that stands out, our comprehensive guide on how to make business cards provides in-depth insights and creative ideas. Whether you're exploring the basics or seeking innovative designs, these resources offer invaluable tips to ensure your business cards make a lasting impression. It's important to add that plastic business cards have a subtle perceived value. They feel similar to credit cards, which means recipients associate your.brand with a heightened worth. So, here is all you need on how to make plastic business cards. Start printing today.
 story
story How to Make Professional Custom Letterhead in MS Word
Make an impression with the beautifully custom printed letterhead. Learn how to make a professional letterhead. With so many styles of letterheads out here, it should become clear why having the right one is so important for the particular message you want to convey. Learn how to create a personal letterhead that reflects your identity. Think hard about what your business stationaries including personal letterhead designs will communicate what your brand is about and help you seal the deal with your clients. Don’t be afraid to get an original custom letterhead just like the one we’ve shared here. After all, the right one might just be what sparks the interest of a new customer! Let your creative self shine by displaying all your amazing ideas on a blank custom letterhead template that you can customize with different designs and get a feel of what the final look will be. What is a Letterhead? A letterhead is a crucial component of any official document that represents a company or an individual. It typically includes the company's logo, name, address, and other contact details. Letterheads are used for various purposes, such as formal correspondence, invoices, contracts, and more. How To Do A Letter Head Template When creating a letterhead template, you need to pay attention to certain elements to ensure a professional and polished look. These elements include the company's logo, name, address, contact information, and any other branding elements that represent your business. One of the essential steps in creating a basic letterhead template is designing a header that contains your company's logo and name. This header should be strategically placed to grab the reader's attention and create a lasting impression. To customize the font and design of your letterhead template, you can choose from a variety of fonts, colors, and styles that match your brand's identity. Consistency in design is key to creating a visually appealing and professional letterhead. Adding contact information, such as phone numbers, email addresses, and physical addresses, to your letterhead template is vital for effective communication. This information allows recipients to easily reach out to your company when needed. Using MS Word to Design a Letterhead Microsoft Word provides a user-friendly platform for designing letterheads with its versatile tools and features. To set up a header and footer for your letterhead in Word, navigate to the header and footer section and input your desired information. Adding logos and branding elements to your Word letterhead enhances its visual appeal and reinforces brand recognition. You can easily insert images and graphics to customize your letterhead and make it stand out. Converting your Word letterhead to a PDF format ensures that the document retains its formatting and layout when shared with others. PDFs are widely accepted and maintain consistency across different devices and platforms. To design a letterhead in Microsoft Word, follow these steps: Open a new Word document and go to the “Insert” tab. Click on “Header” and select “Edit Header” to enter the header section. Design your letterhead by adding your company name, address, contact information, and any other text you want to include. You can also adjust the font style, size, and color to match your branding. To add a logo or image to your letterhead, click on “Pictures” in the “Insert” tab and select the image file from your computer. Resize and position the logo as needed. Once you are satisfied with the design of your letterhead, go to the “Design” tab and choose a color scheme or background for the header. To add a footer to your letterhead, click on “Footer” in the “Insert” tab and enter your desired information, such as a disclaimer or copyright notice. Customize the footer by adjusting the font style, size, and color to match your header. Save your letterhead by going to “File” and selecting “Save As”. Choose a location on your computer to save the document and select the file format as “Word Document” or “PDF” for sharing. By following these steps, you can easily design a professional-looking letterhead in Microsoft Word that reflects your brand identity and enhances the overall presentation of your correspondence. Designing a Stunning Letterhead To create a visually appealing letterhead, consider incorporating graphic design elements, such as geometric patterns, color schemes, and typography. These elements can add a touch of creativity and uniqueness to your letterhead, especially when you are keen on letterhead design specifics. Google Docs is another useful platform for designing letterheads, offering a range of templates and design tools to help you create a professional-looking document. Utilize these features to customize your letterhead according to your preferences. If you prefer to create a letterhead template from scratch, start with a blank document and design it using your brand's colors, fonts, and logos. This allows for complete customization and flexibility in the design process, be it for a personal letterhead or a business stationary. Customizing and Saving the Letterhead Template To save your letterhead template as a reusable document, use the "Save As" function in Microsoft Word and choose the template format. This allows you to access the template whenever you need to create new documents. Branding and customizing your letterhead template ensures that it reflects your company's identity and values.This customization ensures that your letterhead aligns with your brand's visual identity and that your letterhead stands out as unique. Make sure to match the design elements with your brand guidelines to maintain consistency across all communications. When opening a new letterhead template for different purposes, you'll be able to easily customize it based on the specific requirements of the document. This flexibility is crucial when you learn how to create various types of personal letterheads. This flexibility allows you to adapt the letterhead to various uses while maintaining a professional appearance. FAQs Q: What is a letterhead template and why is it important? A: A letterhead template is a pre-designed document containing your company's or personal information that is used for official correspondence. Understanding how to use a letterhead effectively is key. It is important as it adds a professional touch to your communications and helps in brand recognition. Q: How can I create a letterhead template in MS Word? A: To create a letterhead template in MS Word, open a new Word document, design the layout with your company logo, contact details, and any other relevant information. This is a basic step in learning how to make a letterhead. Save the document as a template for future use to streamline your letterhead design process. Q: Can I customize a letterhead template in Microsoft Word? A: Yes, you can customize a letterhead template in Microsoft Word by changing the text, fonts, colors, and other elements to match your brand and preferences. Q: What tools do I need to create a professionally designed letterhead template? A: To create a professionally designed letterhead template, you'll need a word processor like Microsoft Word or Google Docs, your company logo, contact information, and any other branding elements you want to include. Q: How do I make my letterhead template stand out and look stunning? A: To make your letterhead template stand out, use high-quality graphics, choose complementary colors, and ensure that the layout is clear and easy to read. Utilizing Microsoft Word's tools you'll need can greatly improve the letterhead design. A professionally designed letterhead adds credibility to your communications. Q: Can I use an existing letterhead template and customize it for my needs? A: Yes, you can use an existing letterhead template as a base and customize it by adding your own logo, contact information, and other details to make it unique to your brand. Q: How can I ensure that my letterhead template matches my brand identity? A: To ensure that your letterhead template matches your brand identity, make sure to use your brand colors, fonts, and logo consistently across all your marketing materials, including your letterhead.
 story
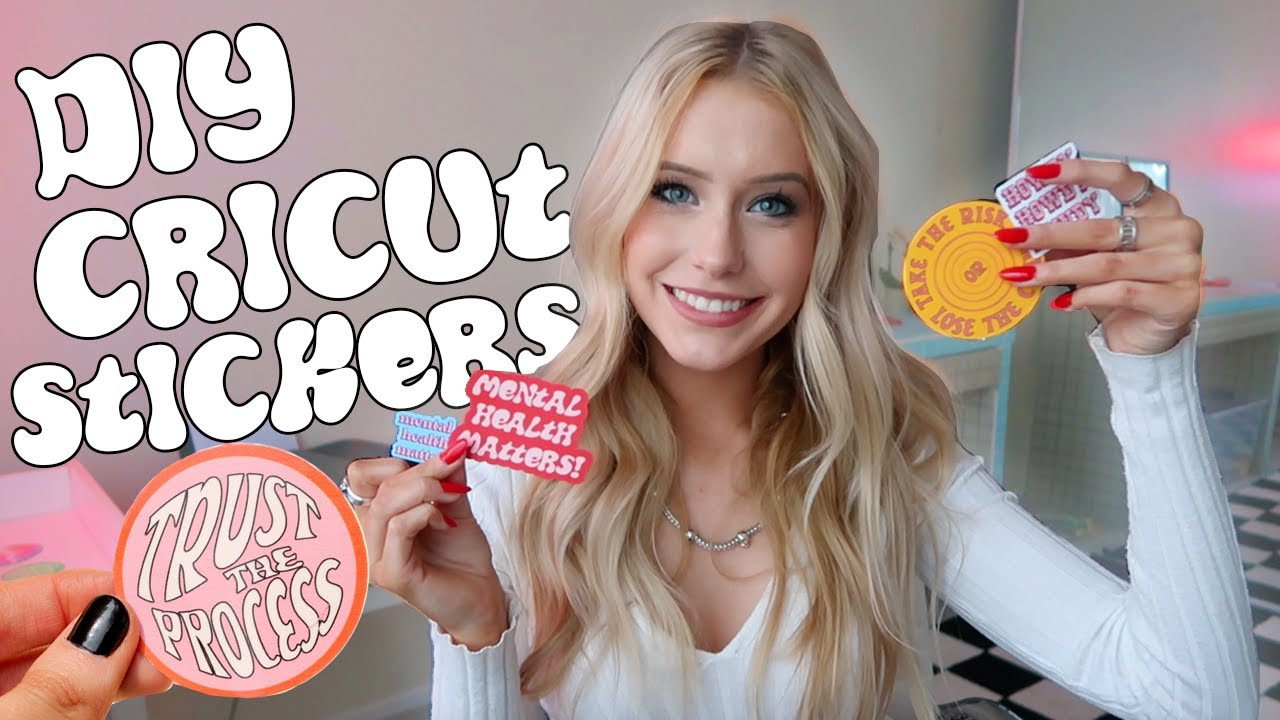
story How To Make Stunning Custom Sticker With Cricut
Sticker Printing With so many styles of customized stickers out there, it should become clear why having the right one is so important for the particular message you want to convey. Think hard about what your sticker will communicate what your brand is about and help you seal the deal with your clients. Don’t be afraid to get an original custom sticker just like the one we’ve shared here. After all, the right one might just be what sparks the interest of a new customer! Custom Sticker Templates Let your creative self shine by displaying all your amazing ideas on a blank custom sticker that you can customize with different designs and get a feel of what the final look will be.
 story
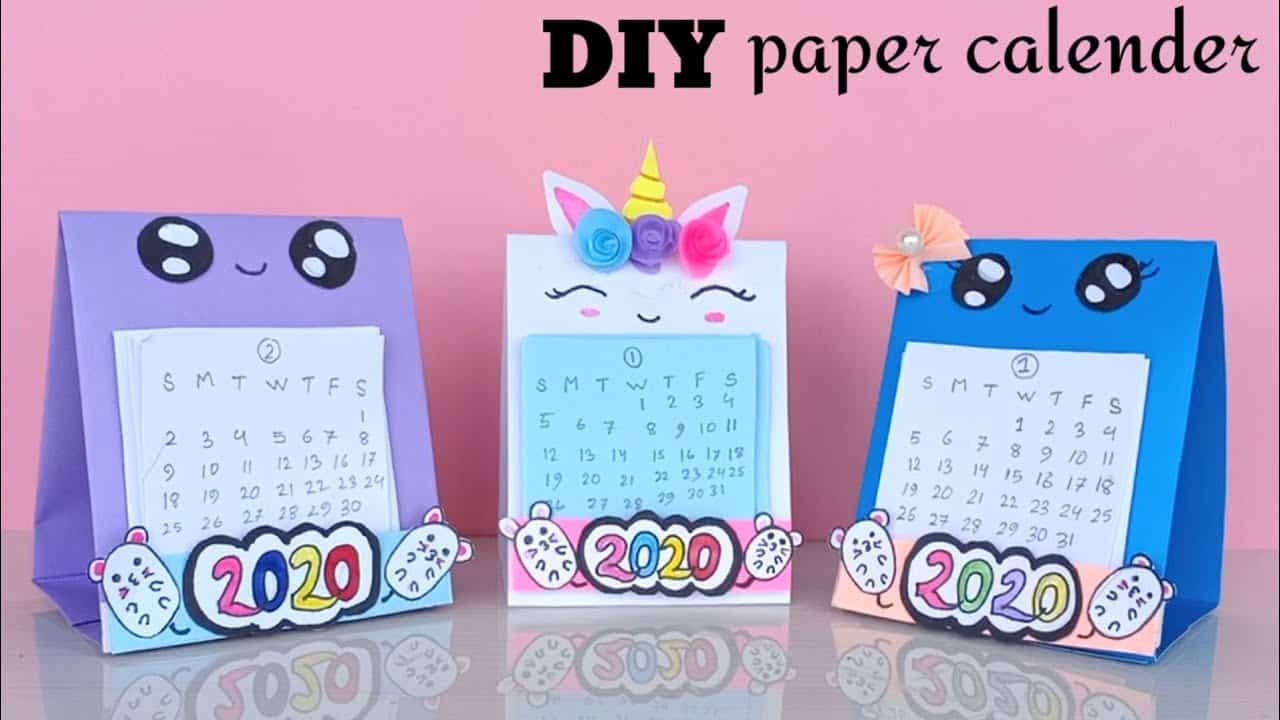
story How to make unique 2020 diy custom calendars
source Plan your life and your schedule with a creative DIY calendar . DIY Custom Calendars Made Easy With so many styles of custom calendars out here, it should become clear why having the right one is so important for the particular message you want to convey. Think hard about what your calendar design will communicate, what your brand is about, and how it will help you seal the deal with your clients. Don’t be afraid to get original custom calendars just like the ones we’ve shared here. After all, the right one might just be what sparks the interest of a new customer! We offer great discounts and hundreds of free templates that will make your brand stand out. Let your creative self shine by displaying all your amazing ideas on a blank custom calendar that you can customize with different designs and get a feel of what the final look will be.