Water and fire effects add great character to designs without having to include many different elements. The effect is not hard to accomplish, but it needs to be done carefully so it looks realistic and professional. Water and fire effects are widely used in marketing campaigns to promote products, because they easily capture the attention of potential and existing customers.
The key to these particular effects is in the brushes, positioning and color blend. We decided to browse the web and bring you some of the best tips to create effective water and fire effects.Water Effect
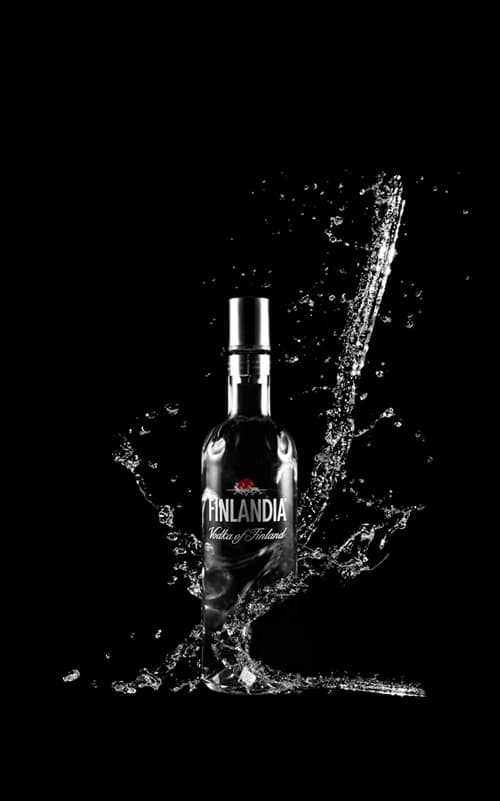 Take a look at this water effect psd tutorial published by Darjanpanic.com using a water splash image:
-
Find an image of a bottle and a water splash to use them in your design
-
Open your bottle image in a new photoshop document and import the water splash file
-
Duplicate the water splash and hide the bottom one so it remains unaltered
-
Scale the water splash to the bottle size, the point of the exercise is to make it look like the water splashes around the bottle
-
Use the rectangular marquee tool to select the bottle area and create a new layer using the “layer via cut” option
-
Select the “Screen” blending on your new layer and apply the Gaussian blur in a way that it looks like the water is behind the bottle
-
Keep working on that layer and with a mask, use the gradient tool to enhance the water illusion. Warp it so it looks distorted, as water would look through a bottle
-
Make the hidden splash visible, scale it and put it in the position you want it to be
-
In order to break the bottom part of your bottle, use a new layer to paint the zone you want to delete white and invert it to white using “CTRL+I”
-
Duplicate the hidden water splash so you create a half-circle that gives the bottle the shape you want
Fire Effect
If it is fire what you’re trying to create, we suggest you follow this fire effect psd tutorial from psdfan to create a flaming guitar and amplifiers:
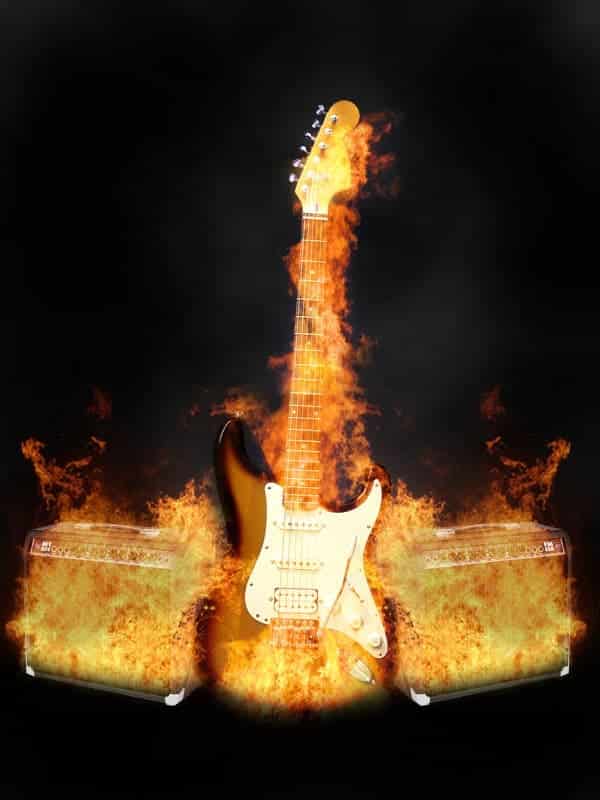
- Image by Psd.fanextra.com
-
Create a new photoshop document with a black background
-
Paste a photo of a guitar (with no background) at the center
-
Paste a bonfire photo at the base of the guitar, using a black background image will allow you to blend it so it becomes transparent
-
Use a large soft eraser to eliminate the base of the bonfire. It should look like the fire starts at the guitar itself
-
Paste an amplifier photo at each side of the guitar
-
Adjust image brightness to -40 and contrast to +9
-
Paste another fire image with a black background and make sure the fire is above all other layers
-
Repeat the blending process to make the fire background transparent
-
Fit the fire to your amplifier shape with the eraser tool
-
Duplicate that fire layer and flip it so you can place it over the other amplifier
-
Take care of the hard edges so it won’t affect your fire shape
Remember that tutorials are made to help you learn a new technique, but your creativity and views are the ones to dictate what the end design should look like. Start experimenting with water and fire effects and create powerful designs worth displaying on a poster printing project.
Let us know of the effects you would like to learn so we can help by suggesting more quality and simple tutorials to follow.